Recruit participants to your research project
To recruit participants to any methinks project you will need to create a research project first. Learn more about how to create a project with methinks thinkers or how to create a project with your users.
To recruit participants
methinks Thinkers project:
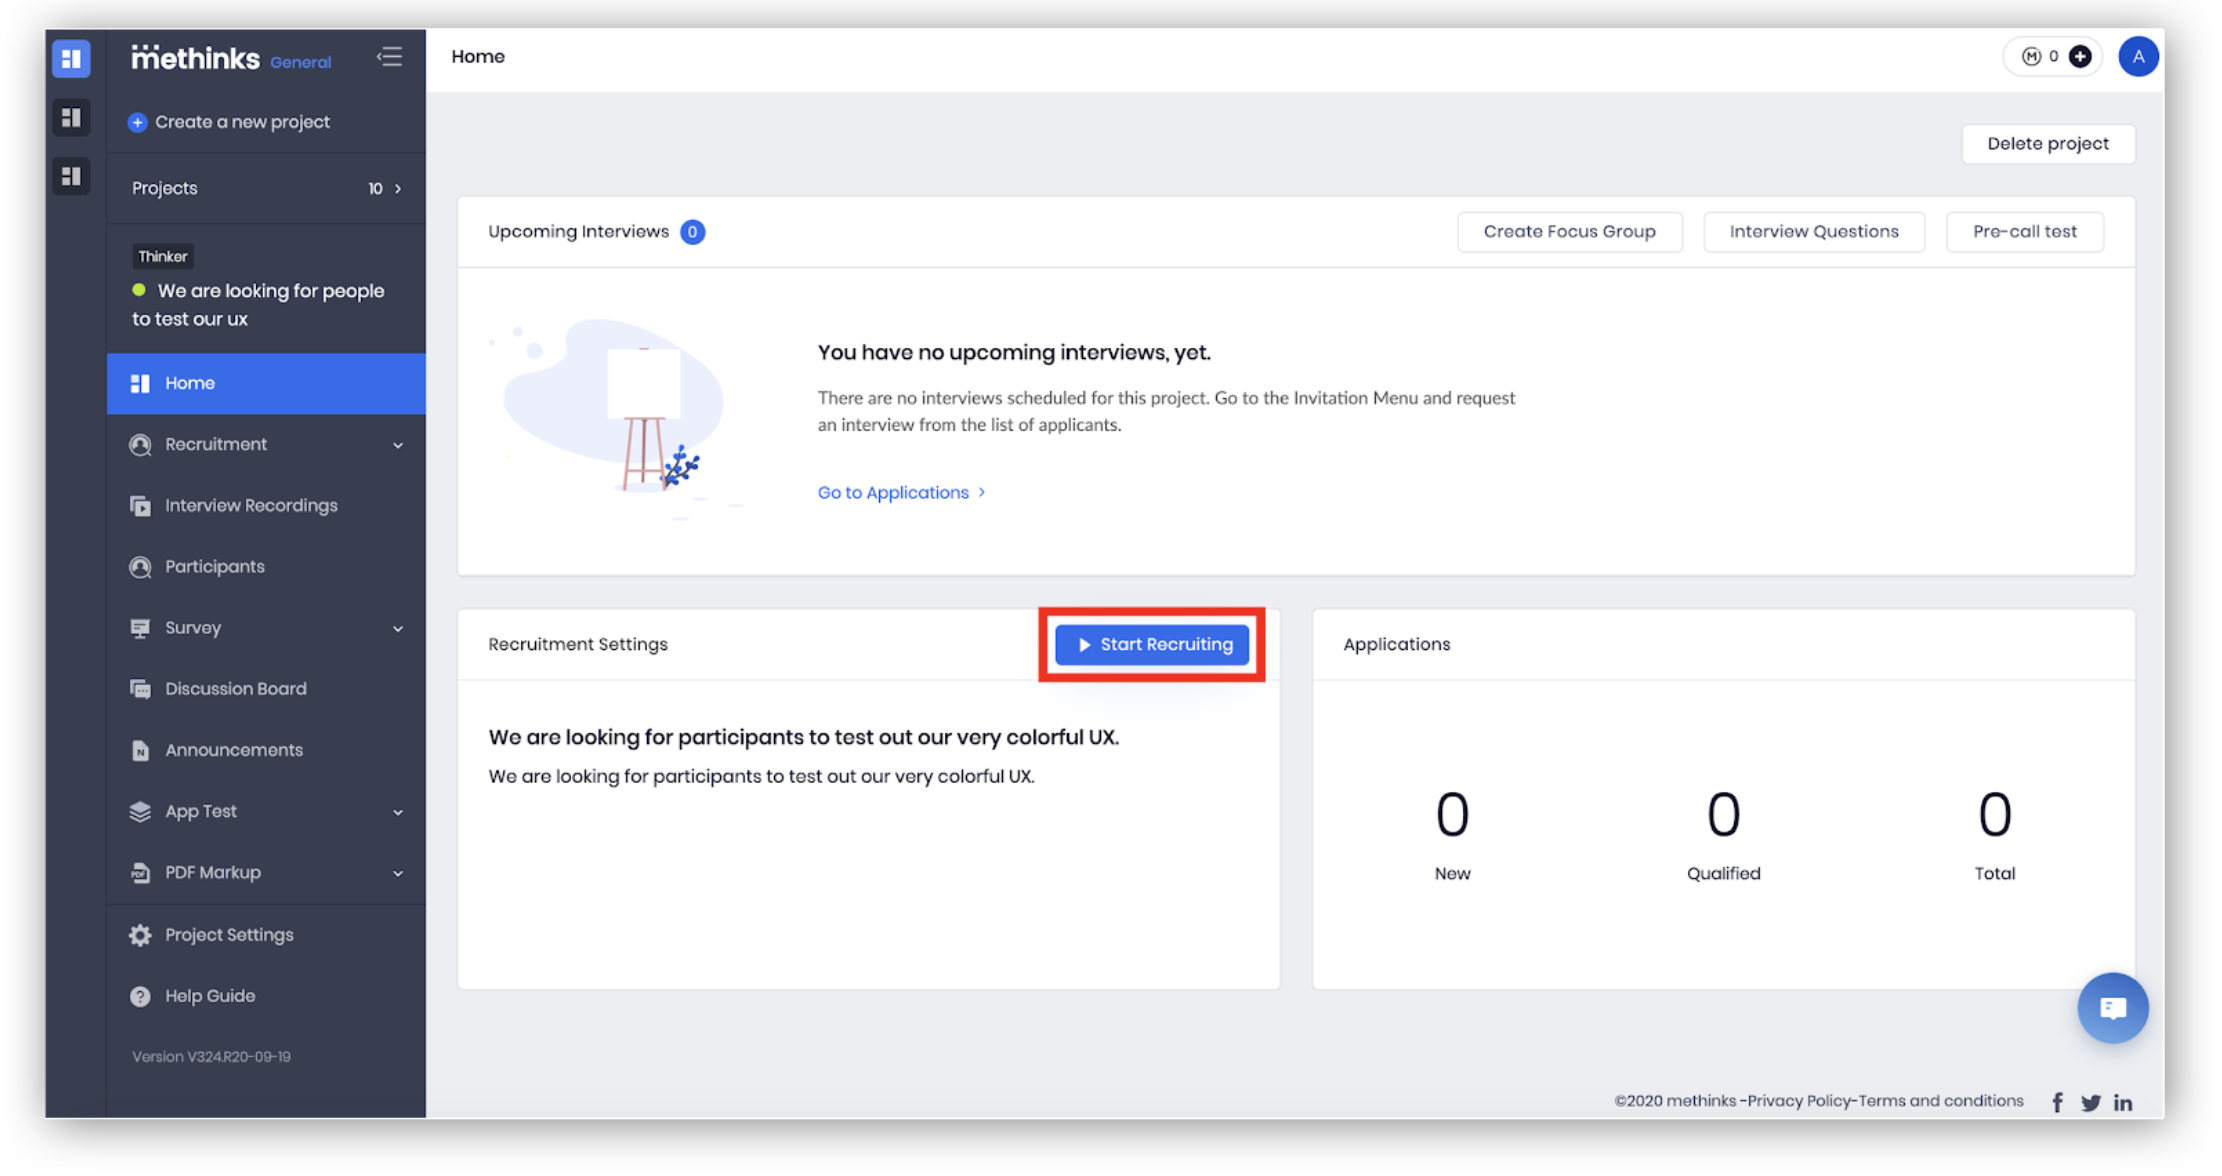
- On your methinks dashboard click on Home.
- Click on Start Recruiting.
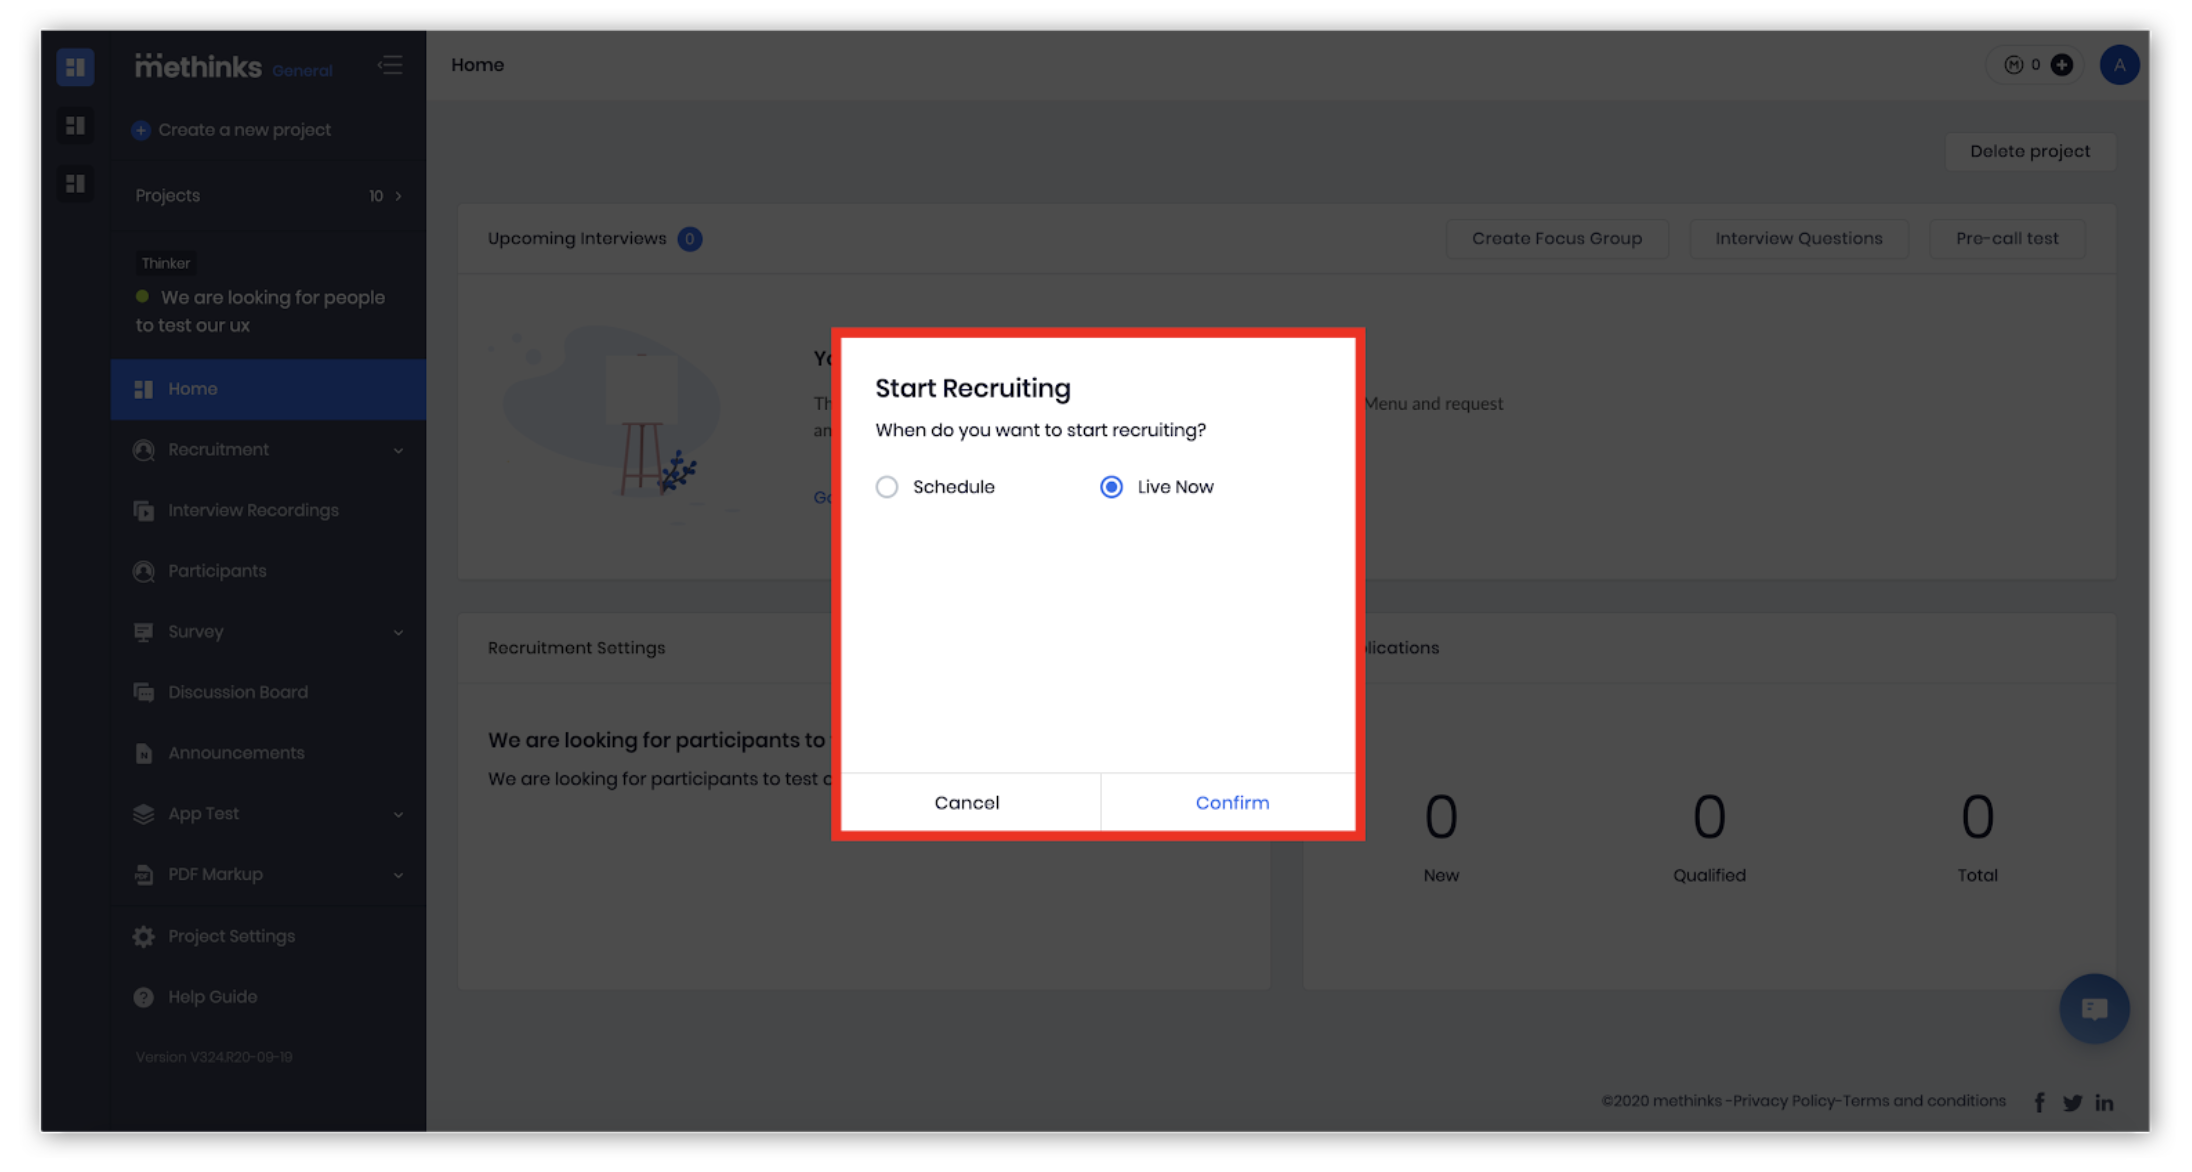
- Choose on the pop-up window the best timeline for your project.
- Live Now: by selecting Live Now your project will become immediately available to Thinkers to apply to once you click on Confirm.
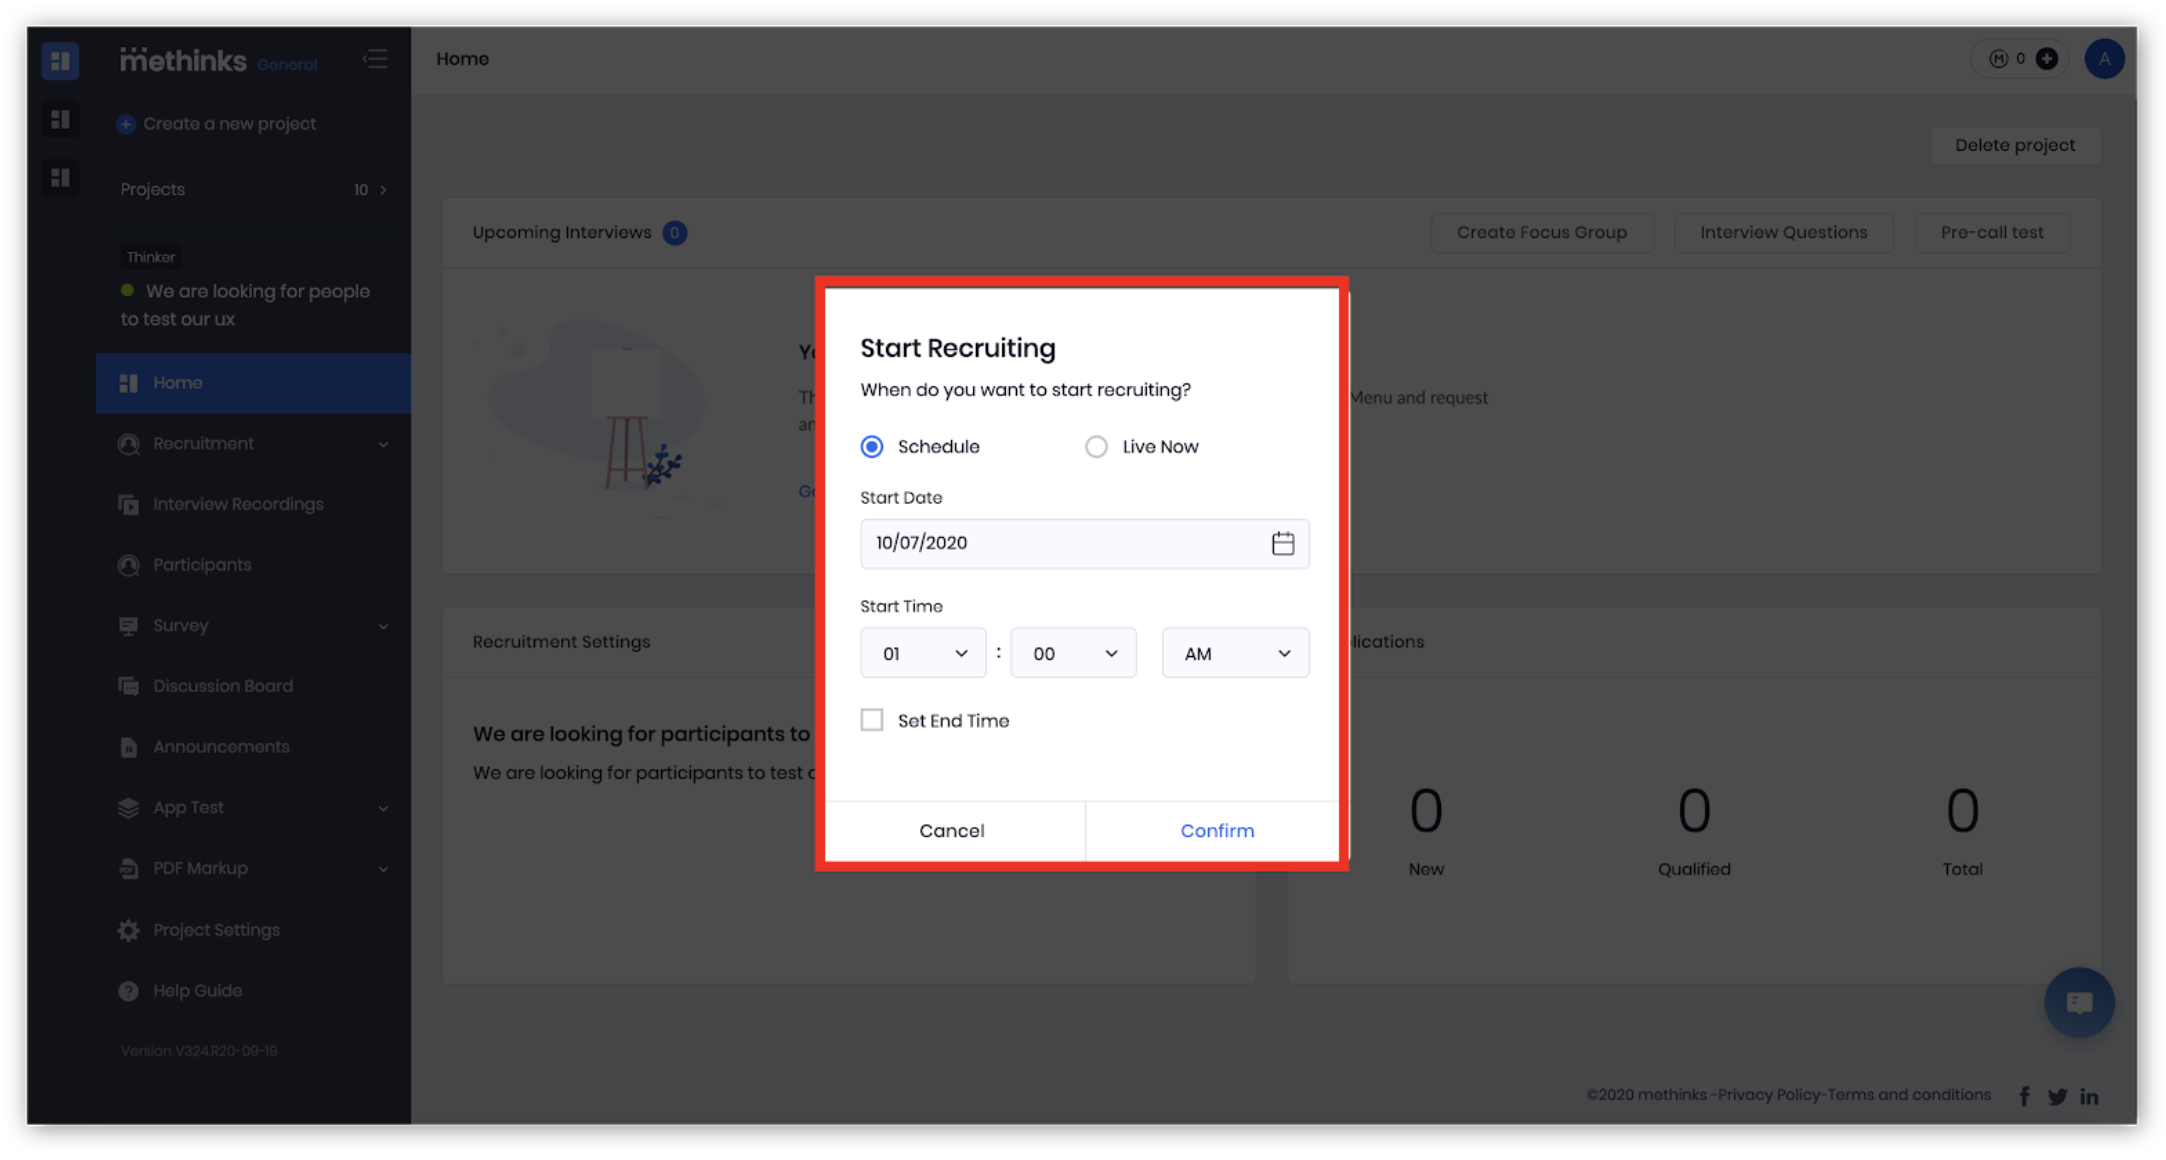
- Schedule: by selecting Schedule you will be able to choose the date and time you wish to make your project available to Thinkers to apply to.
To select a Start Date: simply click on the date field and select the date you want.
To select a Start Time: simply click on the time fields and select the time settings you want.
To set an End Time: mark the checkbox Set End Time. The recruiting menu will expand and you can then select the time that you want your project to stop recruiting at. Click on the date/time fields and select the option that best fits your project.
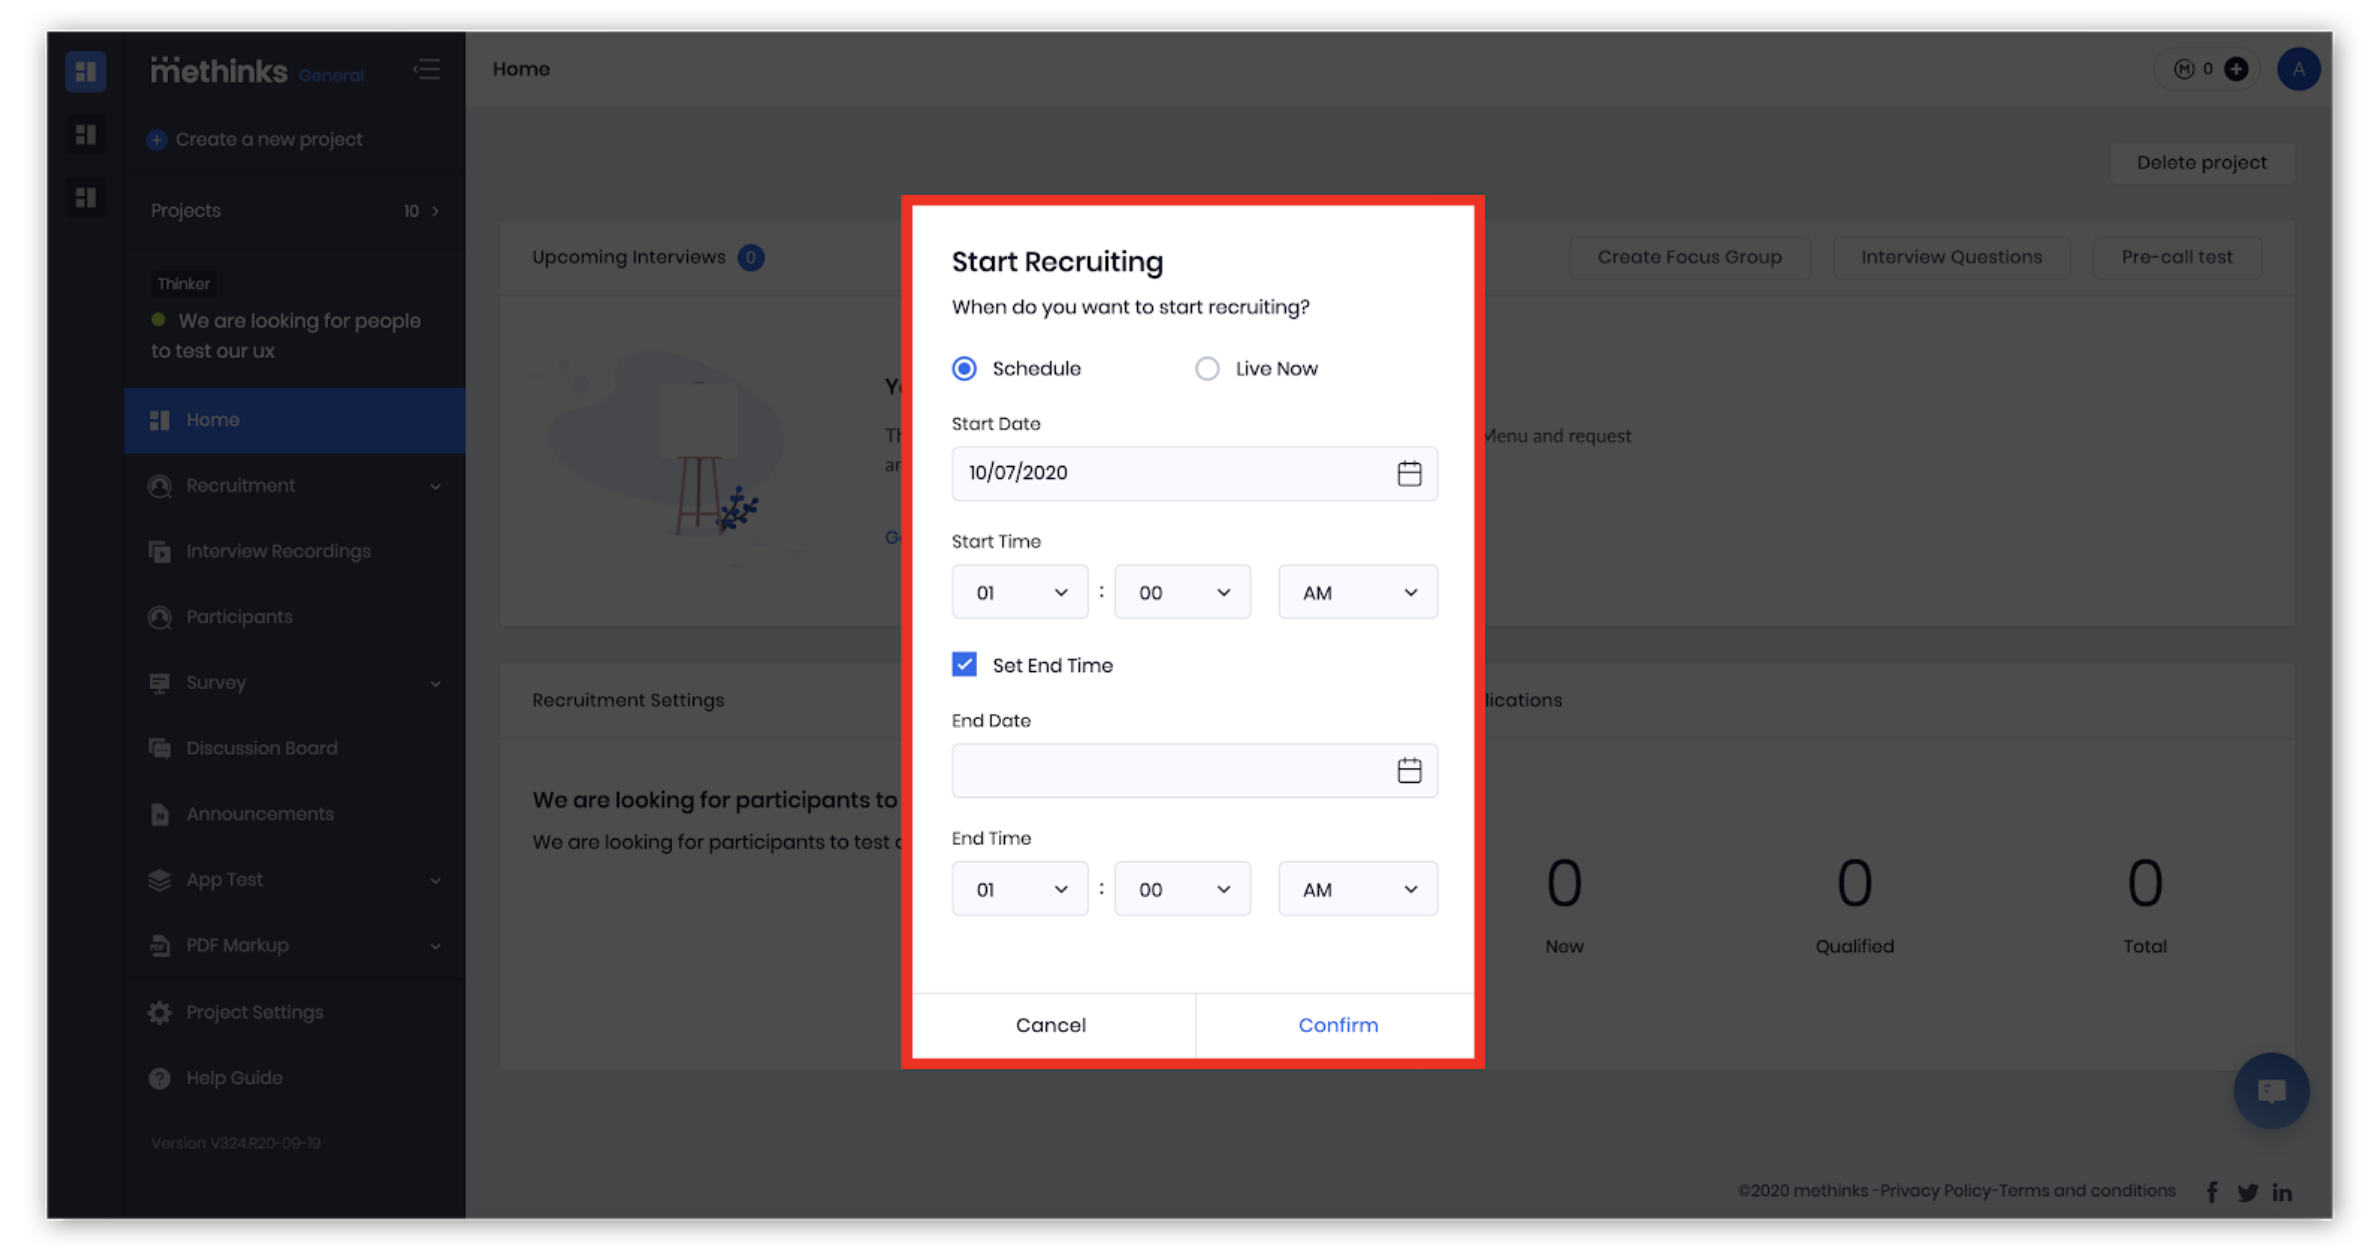
Note: Once the End Date has arrived your project will stop recruiting automatically, meaning that Thinkers won’t see your project anymore on their Thinker app and/or be able to apply. You can change these settings anytime and postpone or remove the end date by clicking on Recruitment > Settings.
Pro tip: You can stop and restart recruiting anytime by clicking Start Recruiting and/or Stop Recruiting under Recruitment Settings. To do so, click on Home > Start/Stop Recruiting or click on the dropdown menu button Recruitment > Settings to view your recruitment settings. Click on Start/Stop Recruiting.
Learn how to view and organize project applications, set up target criteria, and edit recruitment settings.
My Users Project
Screening required
- On your methinks dashboard Home click on Start Recruiting.
- You will see a pop up with Invitation Settings.
- Click on the dropdown menu button to change the invitation to Manual Invitation or Auto Invitation.
Invitation method:
1. Click on the drop-down menu to select Manual Invitation or Auto Invitation. If Auto Invitation is selected, input the number of participants that should be invited to participate in your project.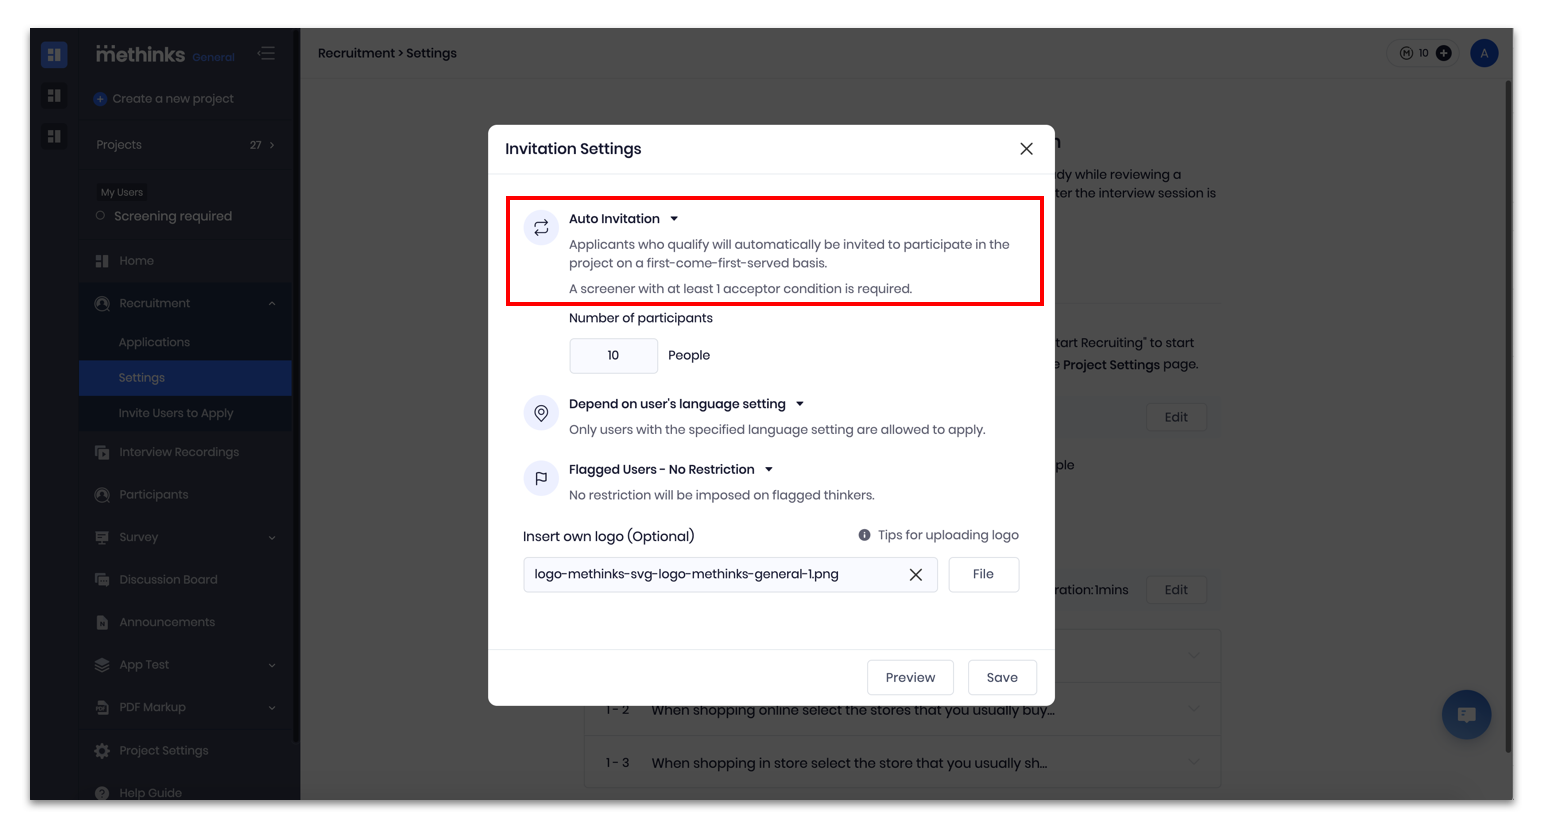
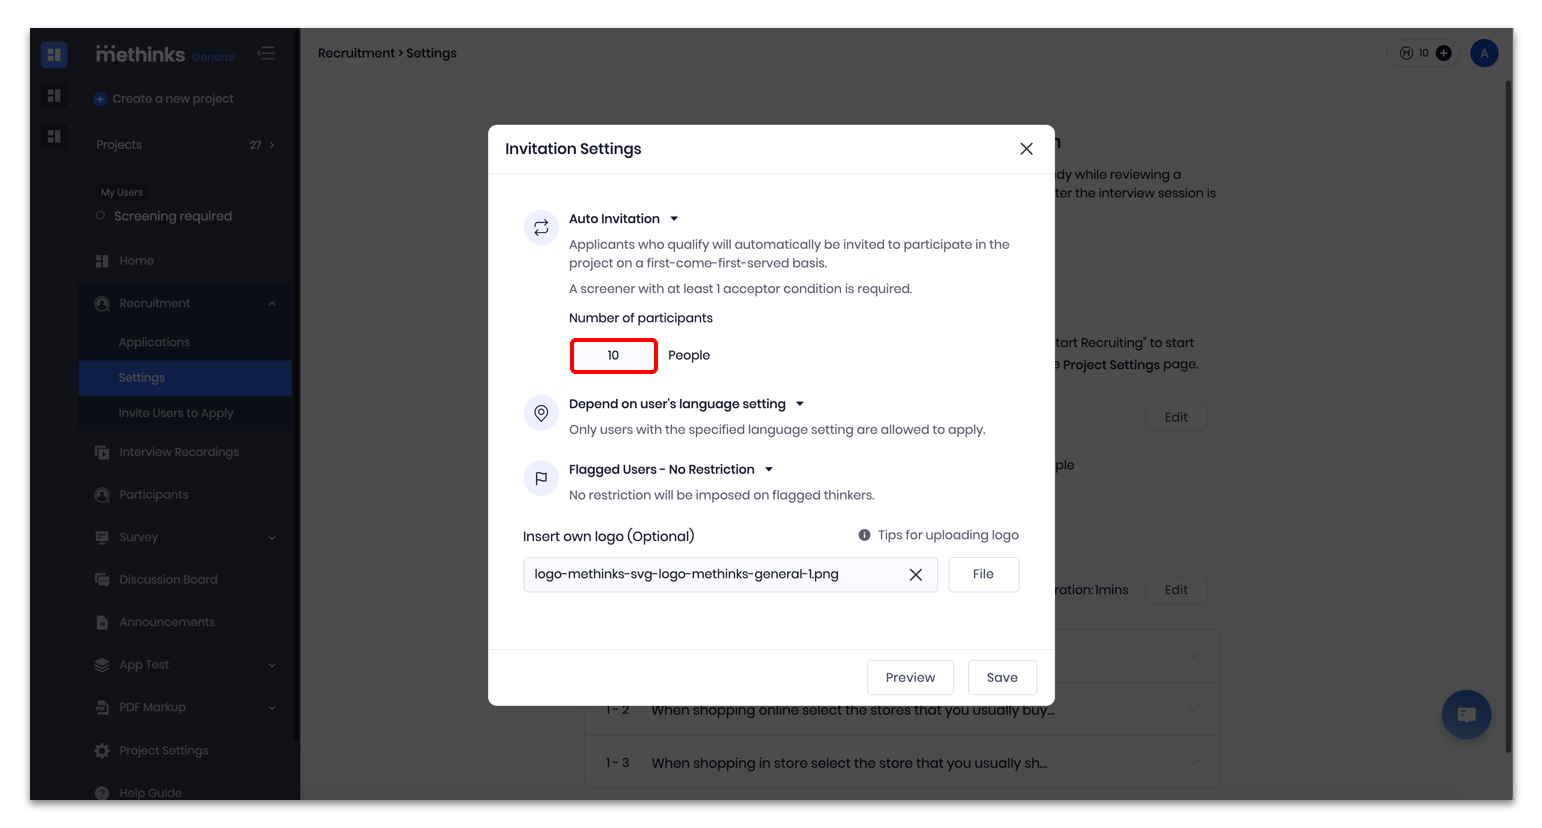
Note:
1. You can edit the number of participants for auto invitation at any time.
2. The difference between Manual Invitation and Auto Invitation is that with Auto Invitation, users can be automatically invited to the project based on their screener answers, and they would be able to start completing tasks (e.g. survey) right away. With Manual Invitation, you will have to invite users manually (by yourself). Learn how to review project applications and how to check screener question answers.
Language setting:
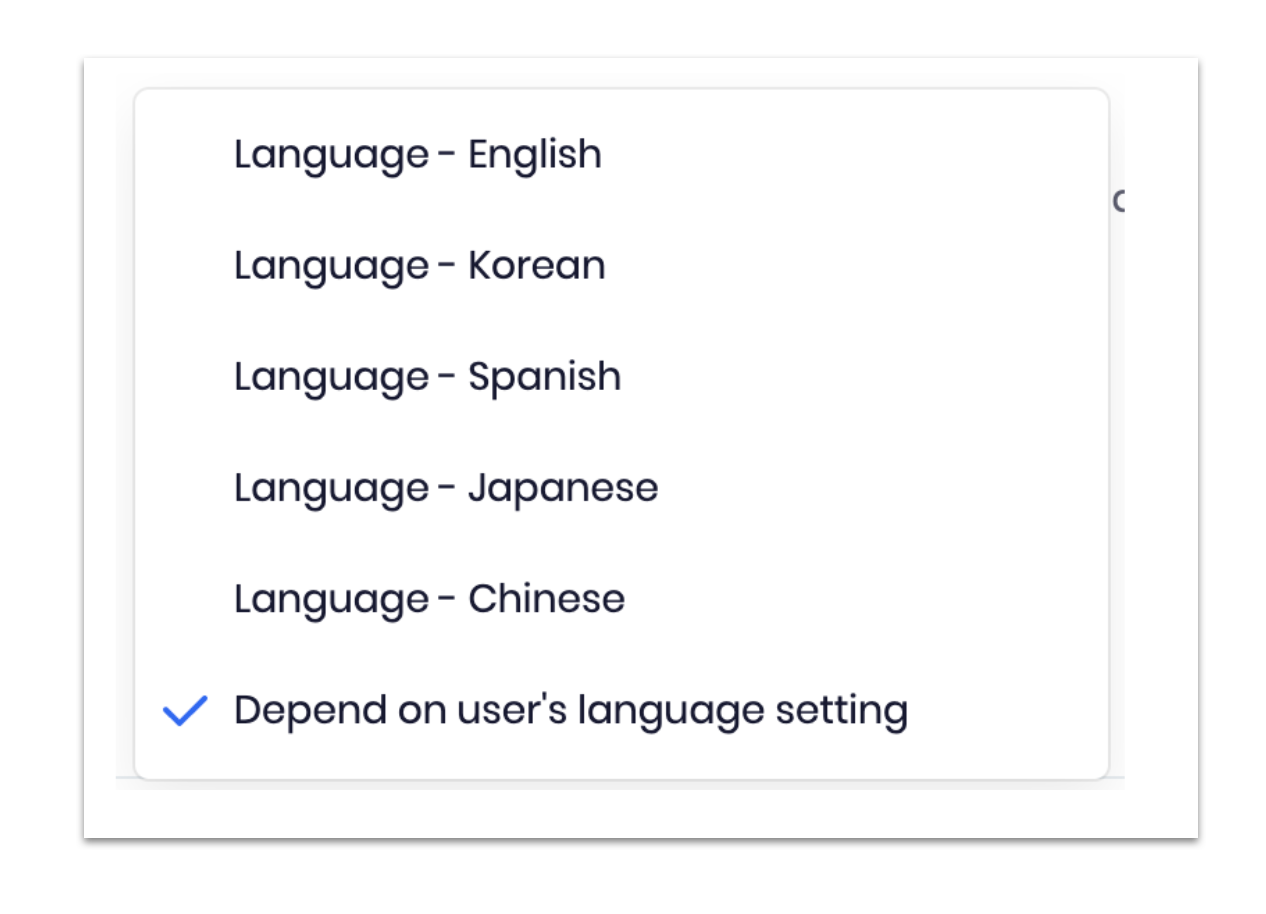
1. Click on the drop-down menu to change the language selection.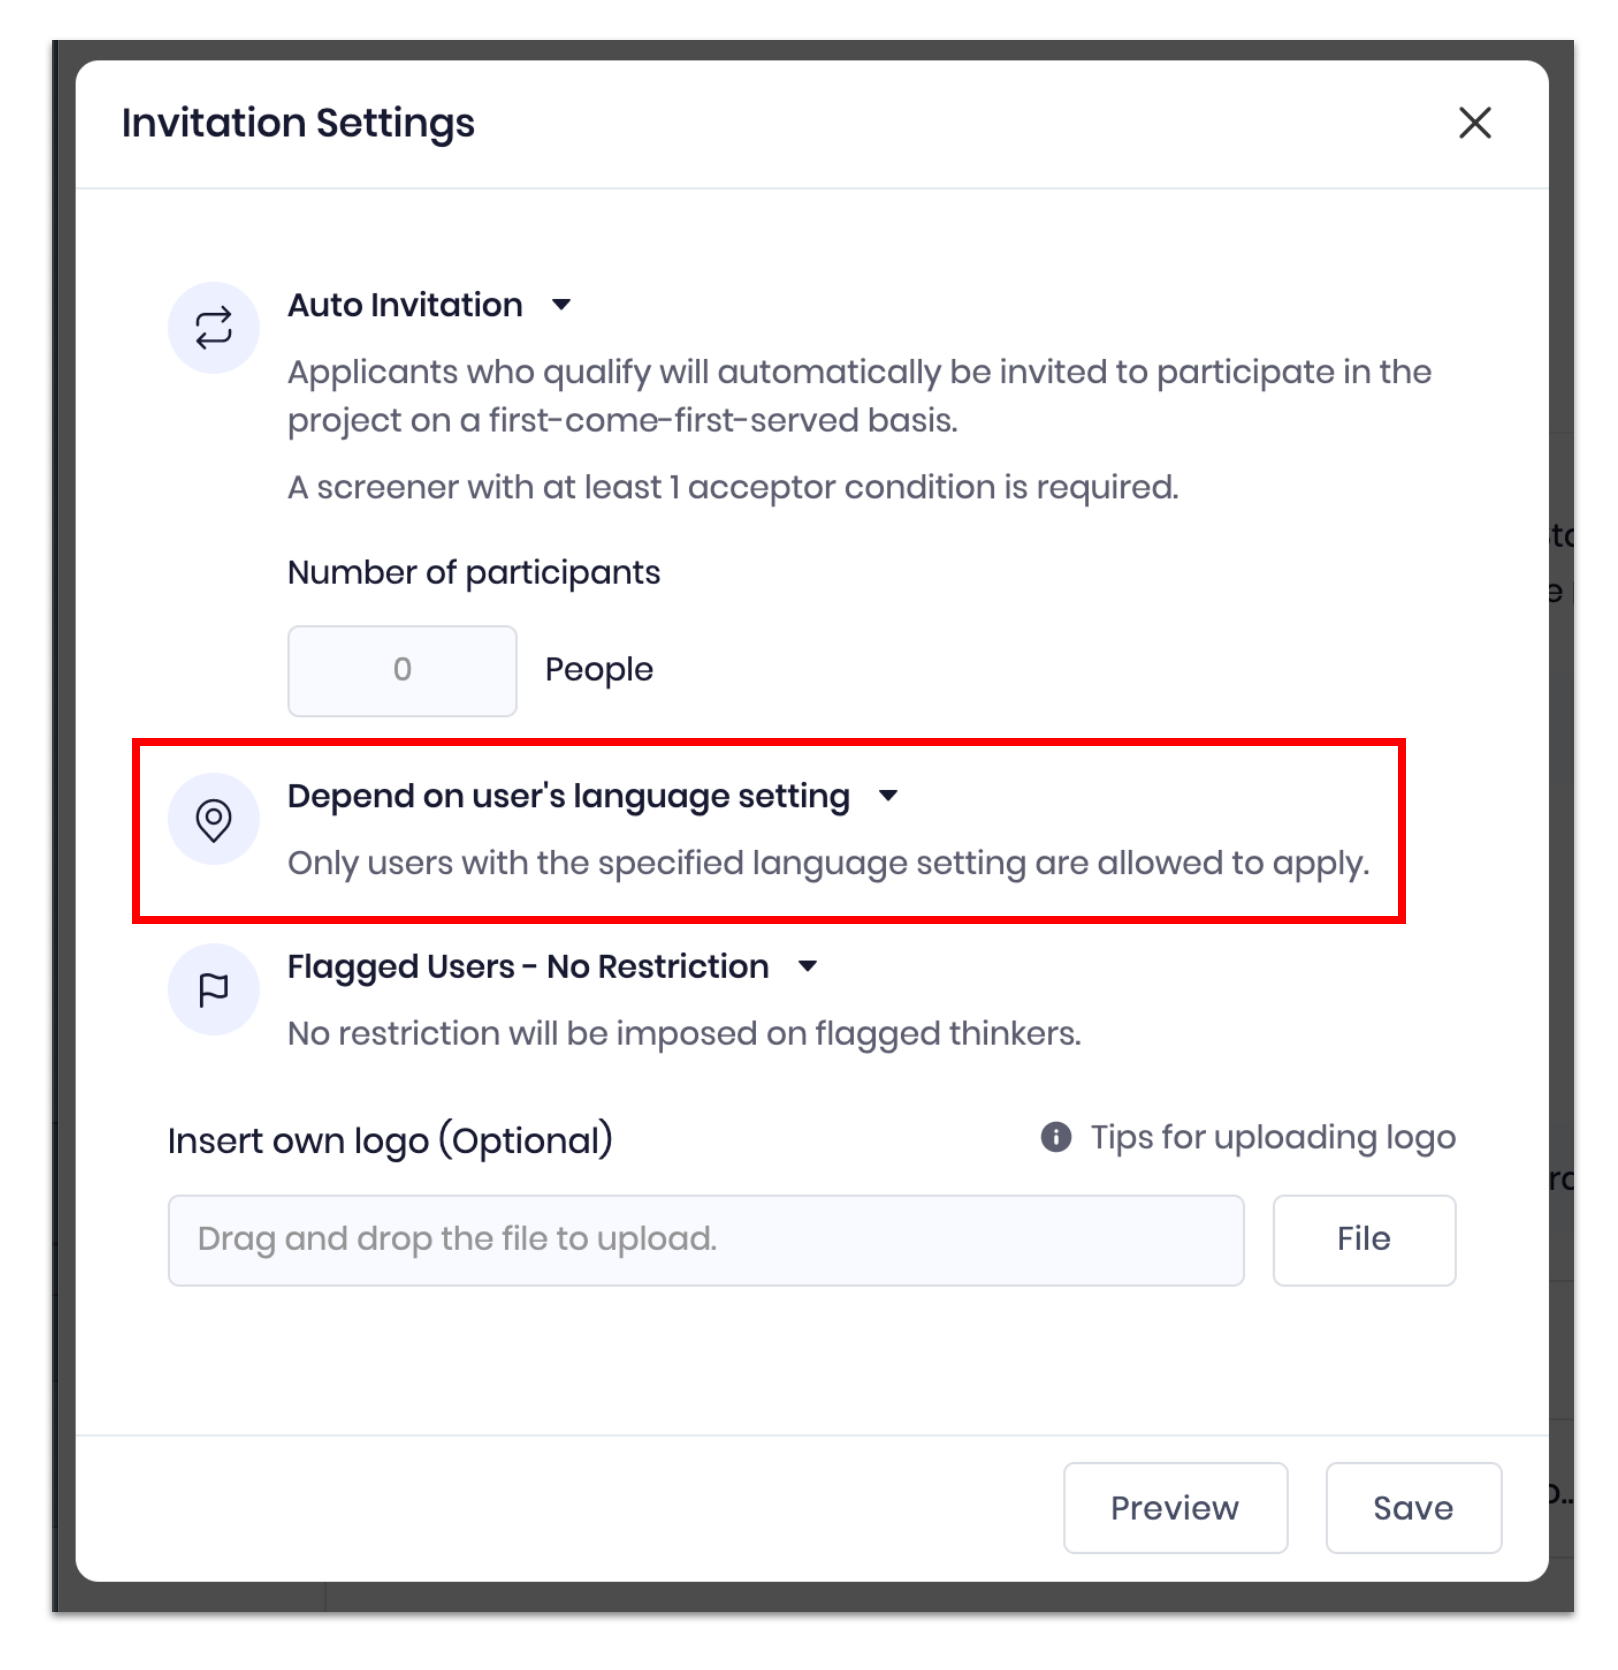
2. Click to select the option that best fits your project needs.
Flagged Users settings
*Flagged Users that were flagged by you or other researchers. Flags include: No Show, No response, Unengaged, False Information, Inappropriate, and any custom flags researchers have added. Learn more about Flagged Users/Thinkers.
1. Click on the Flagged Users drop-down menu to make changes to the flagged Users settings. 
2. Click on the best setting that fits your research project.
Flagged Users - Restricted Qualification
Do not automatically qualify flagged users.
Flagged Users - Automatic Disqualification
Automatically disqualify flagged users.
Flagged Users - No Restriction
No restriction will be imposed on flagged users.
Note: You can always manually qualify and disqualify users if needed.
To insert your logo:
If you choose to add a logo, the image will be implemented on your project page. Example below. To select an image:
1. Click on File.
2. Choose the image you want to upload and click on Open.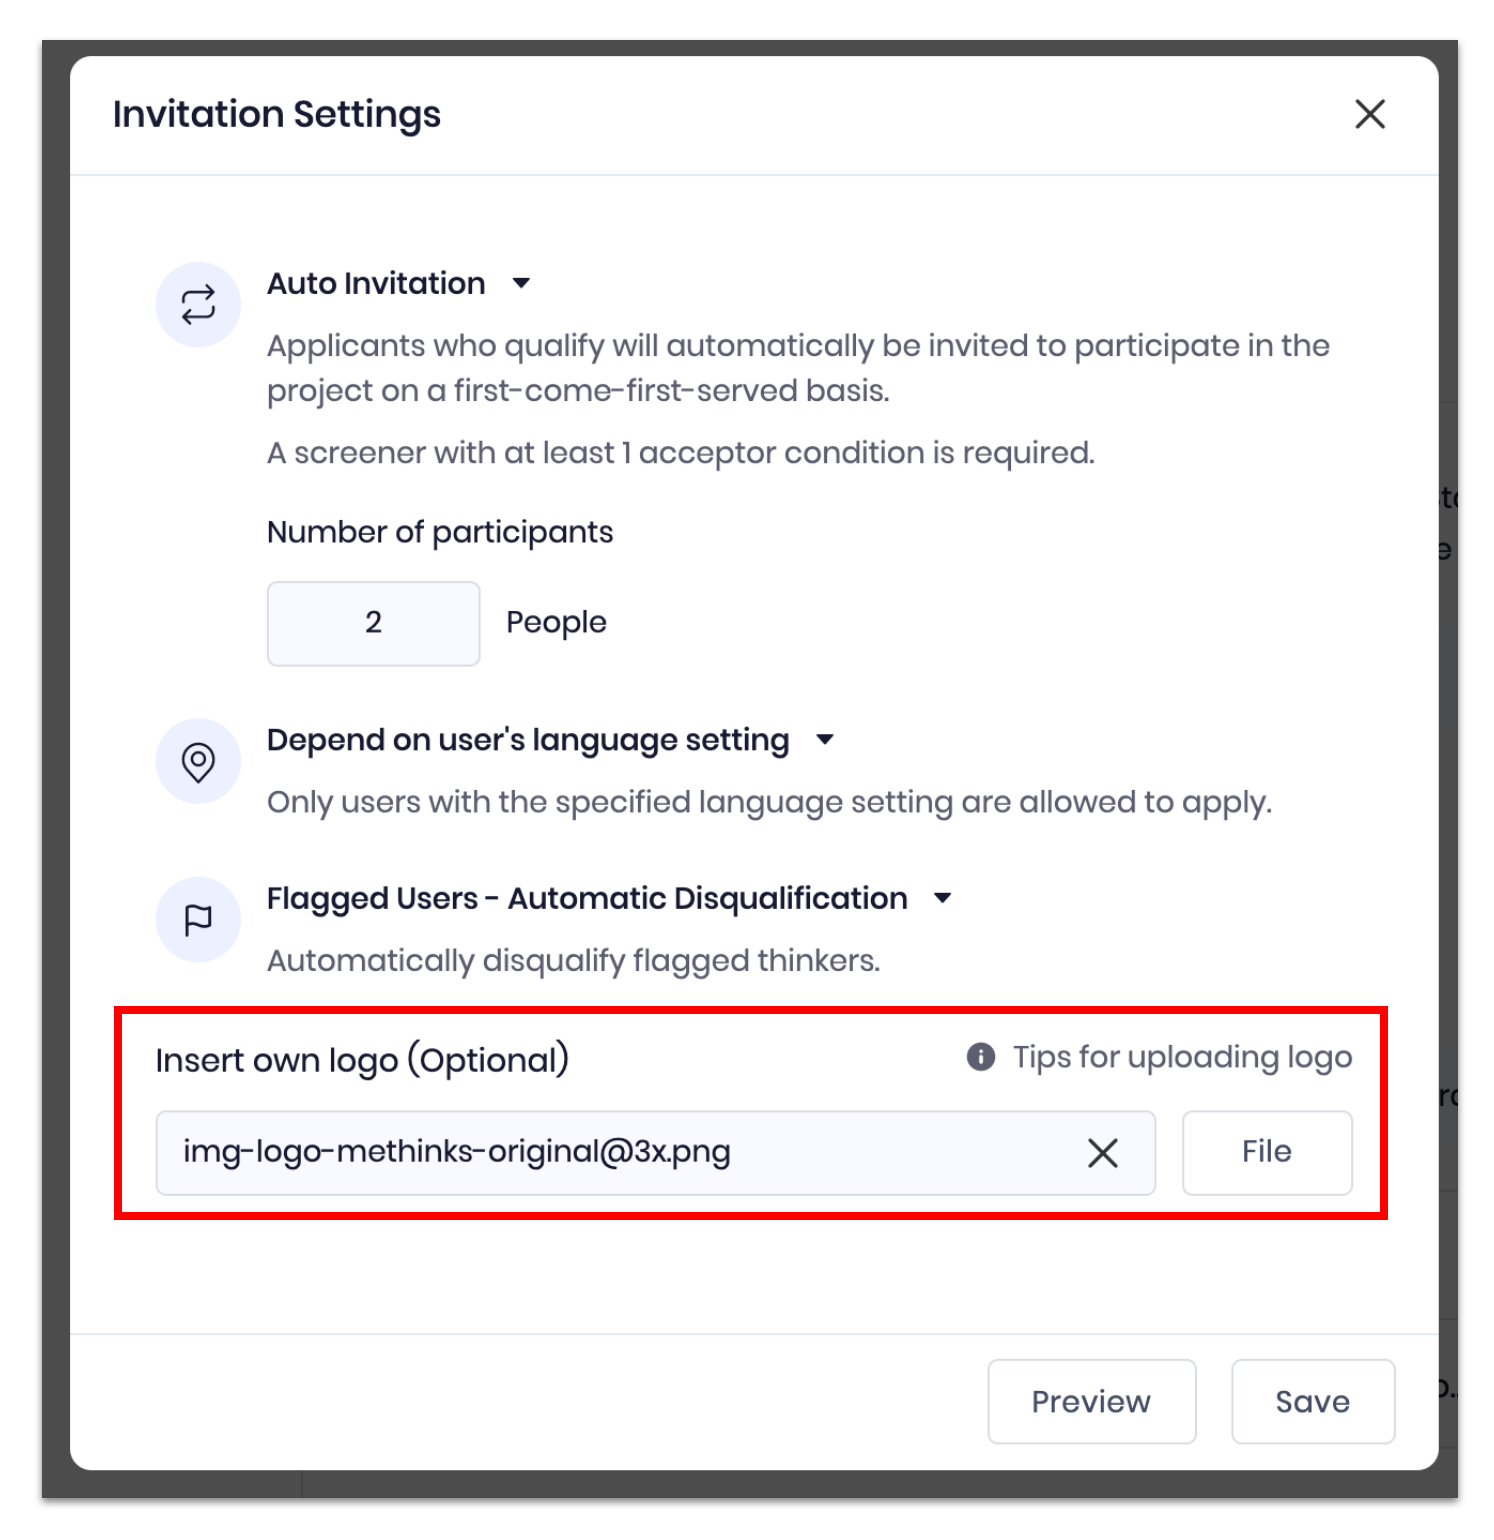
3. Click on Preview to preview your project invitation page.

4. Click on Save.
Note: Edit recruitment settings anytime by clicking on:
Recruitment > Settings > Invitation Settings > Edit.
Learn more about how to set up recruitment and change project recruitment settings.
- To share your research project link:
1. Click on Recruitment > Settings.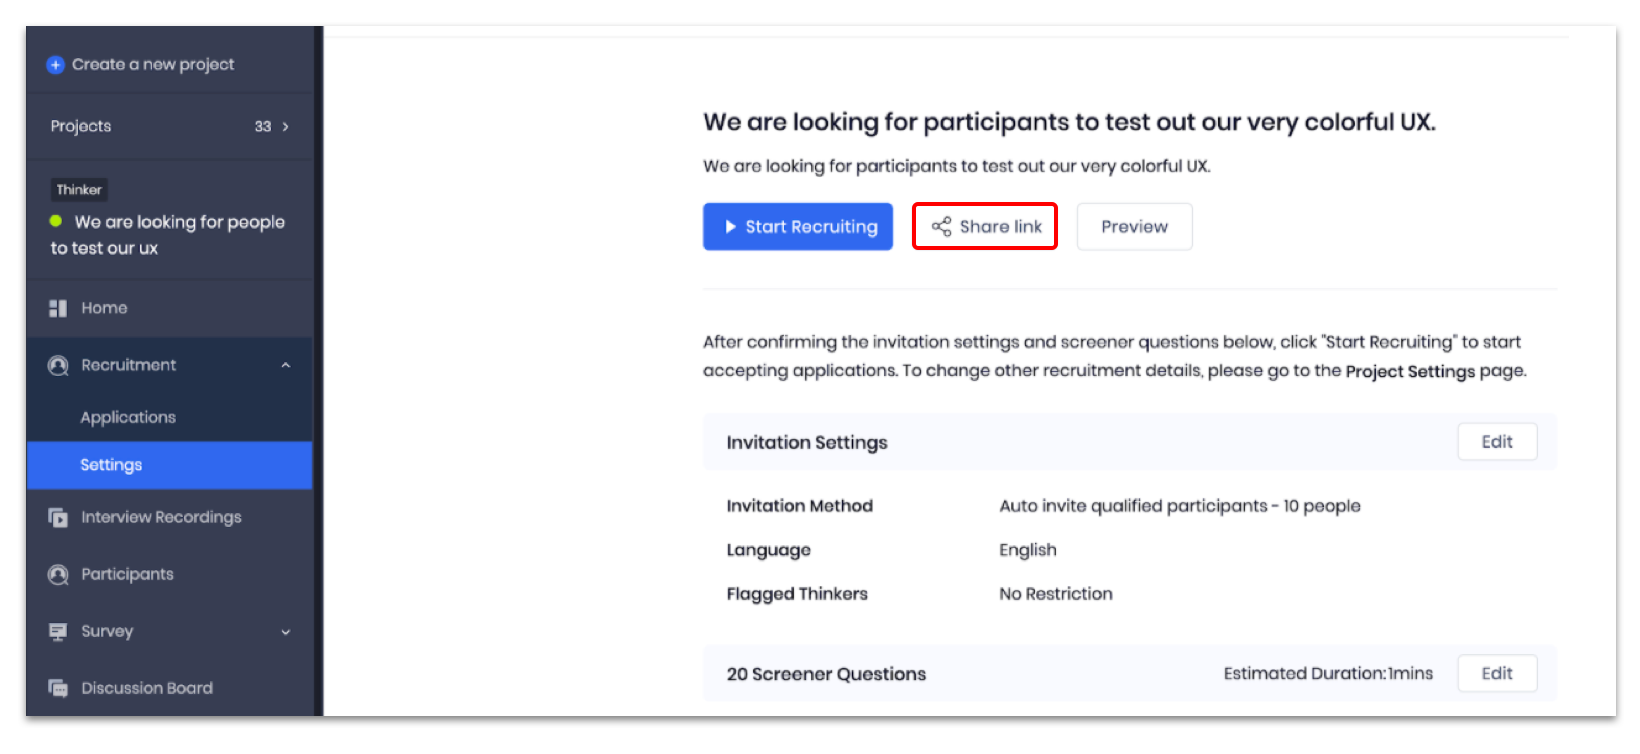
2. Click on Share link.
3. Click on Copy.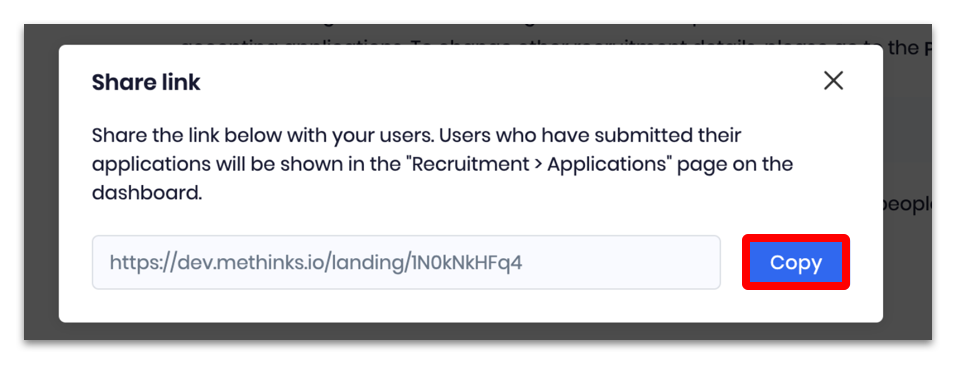 4. Share the link with people that you want to apply to the research project.
 - To invite users to apply to your research project:
1. On your methinks general dashboard click on the drop-down menu button Recruitment.
2. Select Invite Users to Apply.
3. Click on Invite Users. 4. Add user’s information individually or in bulk.
- To add users individually:
1. Insert the name and e-mail address of the user you want to invite.
Note: You can also add a memo about the user for your reference.
- To bulk import users:
1. Click on Bulk import using template.
2. Drag and drop a file to the selected area or click on Browse to upload template. If the latter is selected, click on Open.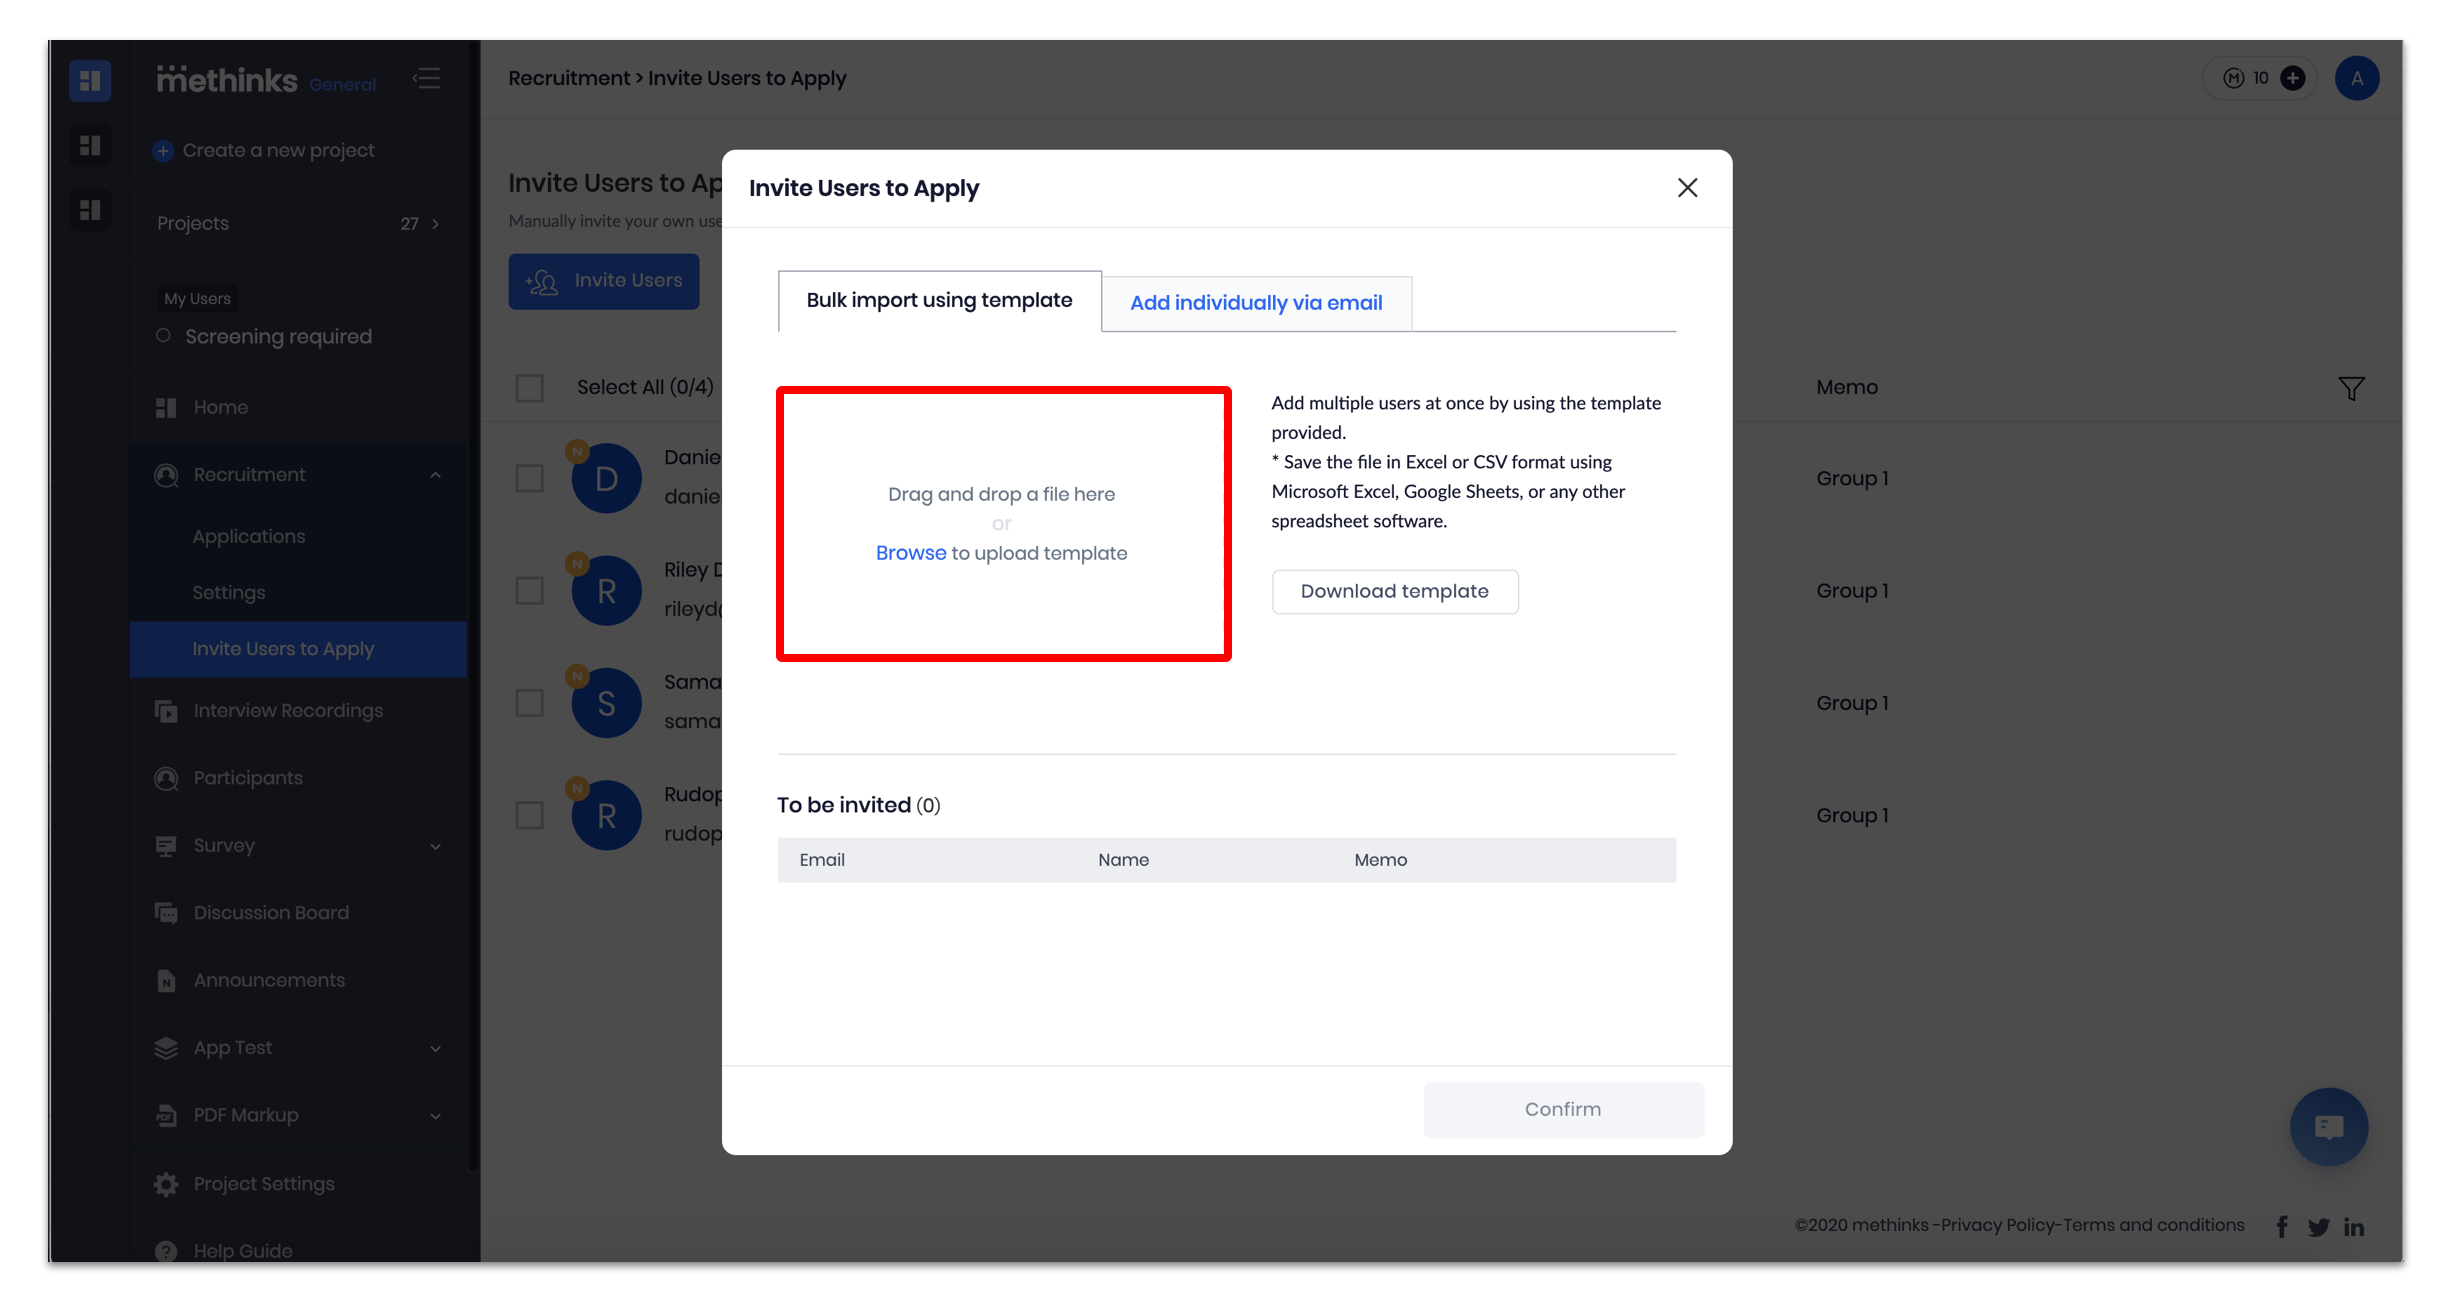
All imported user’s details will be available under the section To be invited.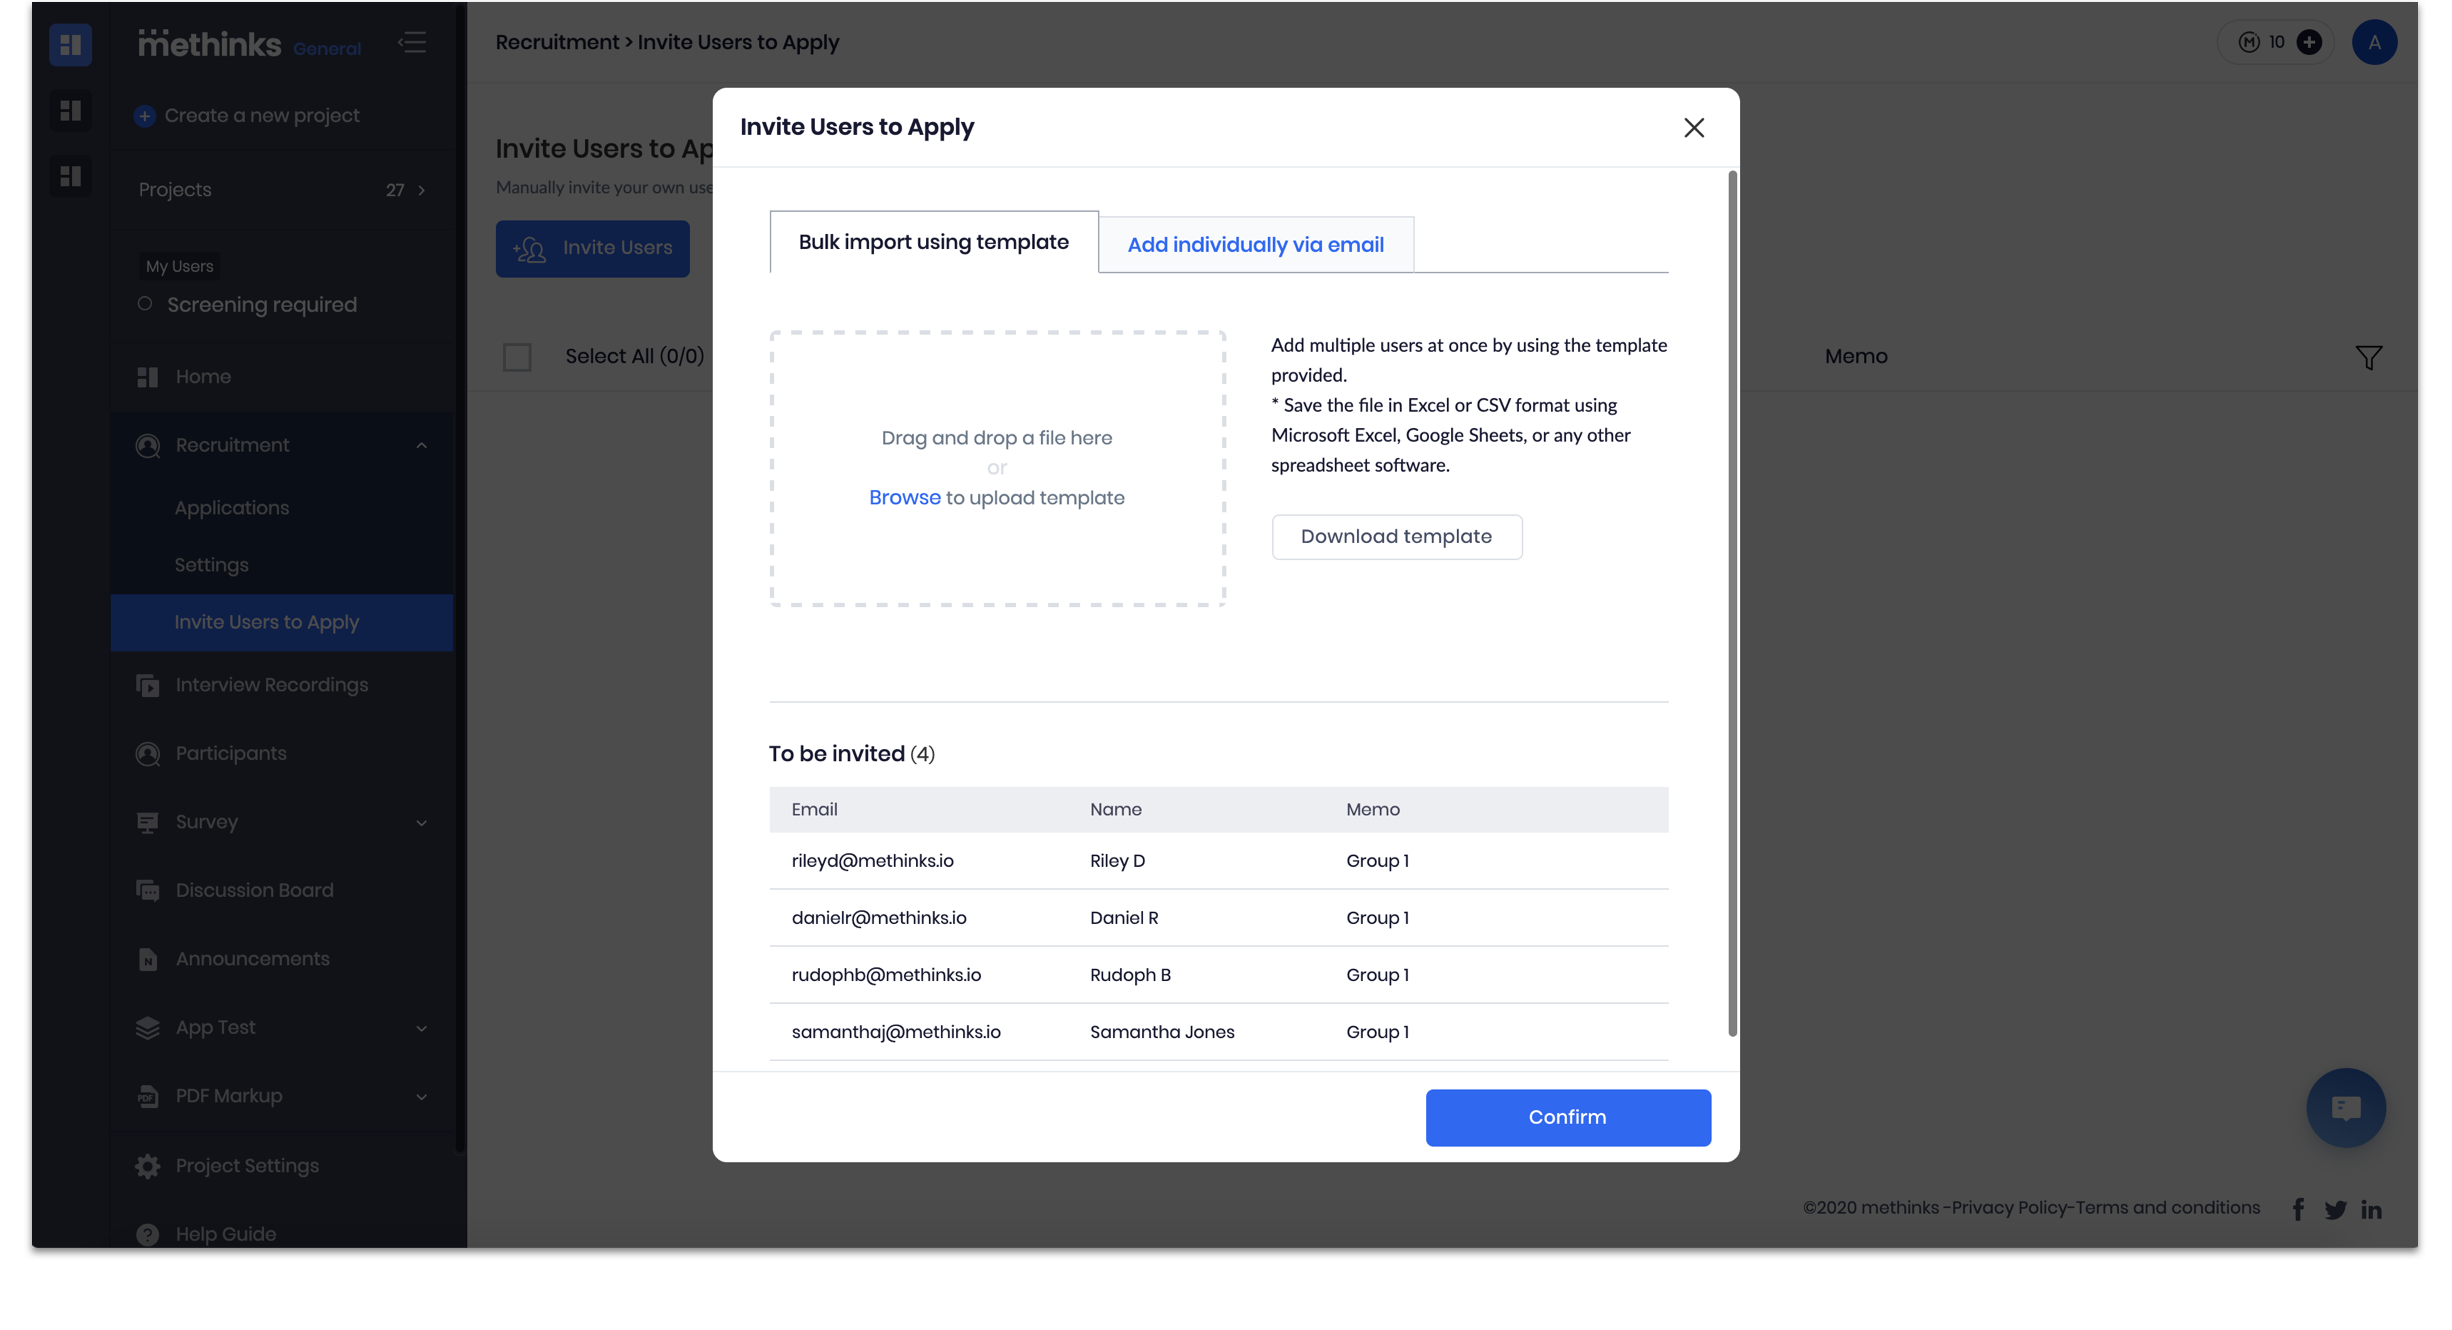
4. Click on confirm.
Note: Once you click Confirm, the user will receive an e-mail invitation from methinks to participate in your project.
- To delete a user’s information:
1. Click on the trash can icon.
Pro tip: By clicking on the drop-down menu button Participants > Participants you can view all of the users that you have invited that accepted the invitation to participate in your project.
- To view a user’s status:
- Click on Participants.
- Check the user’s status by looking at their profile summary.
The Waiting for Confirmation tag means that the user has not yet confirmed their participation.
If a tag Waiting for Confirmation is not spotted, this means that the user has already confirmed their participation and is ready to start participating in your project and performing tasks.
- To view the users who have applied to your project thus far:
1. Click on the drop-down menu button Recruitment > Applications.
My Users Project
No Screening Required
To invite your own users to your project without any screening:
1. On the Home page, click on Invite participants now, or click on the Participants dropdown menu button and select Invite Users to Participate.

2. Click on Invite Users to Participate.
3. Click on Invite Users.
4. Add user’s information individually or in bulk.
- To add users individually:
1. Insert the name and e-mail address of the user you want to invite.
Note: You can also add a memo about the user for your reference.
- Click on Add.
- Click on Add.
-
To bulk import users:
1. Click on Bulk import using template.
2. Drag and drop a file to the selected area or click on Browse to upload template. If the latter is selected, click on Open.
All imported user's details will be available under the section To be invited.
4. Click on confirm.
Note: Once you click Confirm, the participant will receive an e-mail invitation from methinks to participate in your project. - To delete a user’s information:
1. Click on the trash can icon.

Pro tip: By clicking on the drop-down menu button Participants > Participants you can view all of the participants that you have invited that accepted the invitation to participate in your project.
- To view a user’s status:
Option 1: Check the Status column.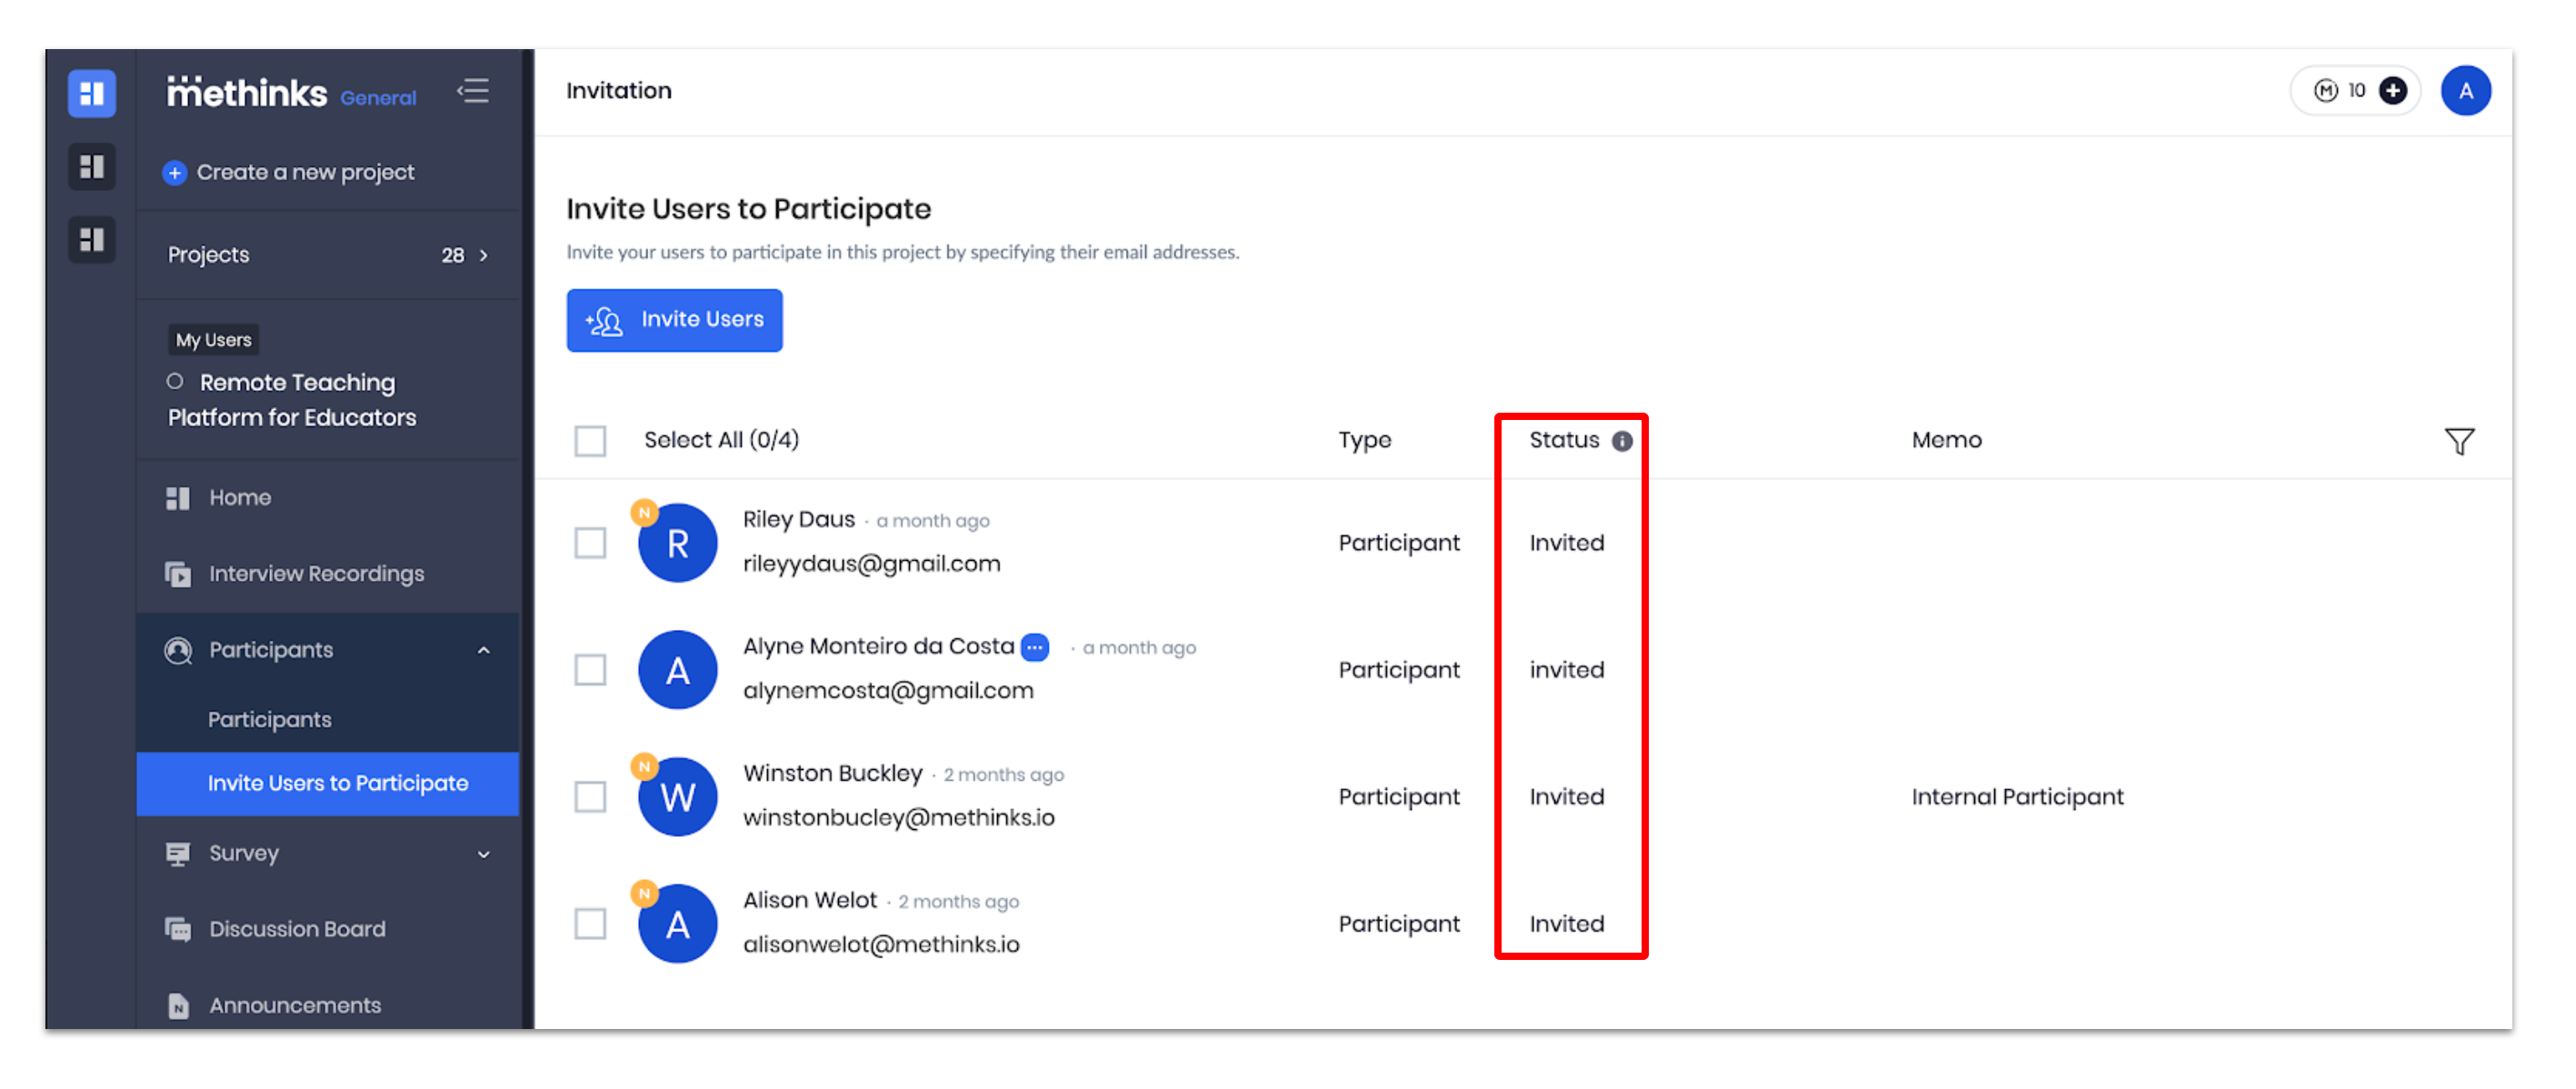
1. Click on the I (Information) icon to learn more about the status descriptions.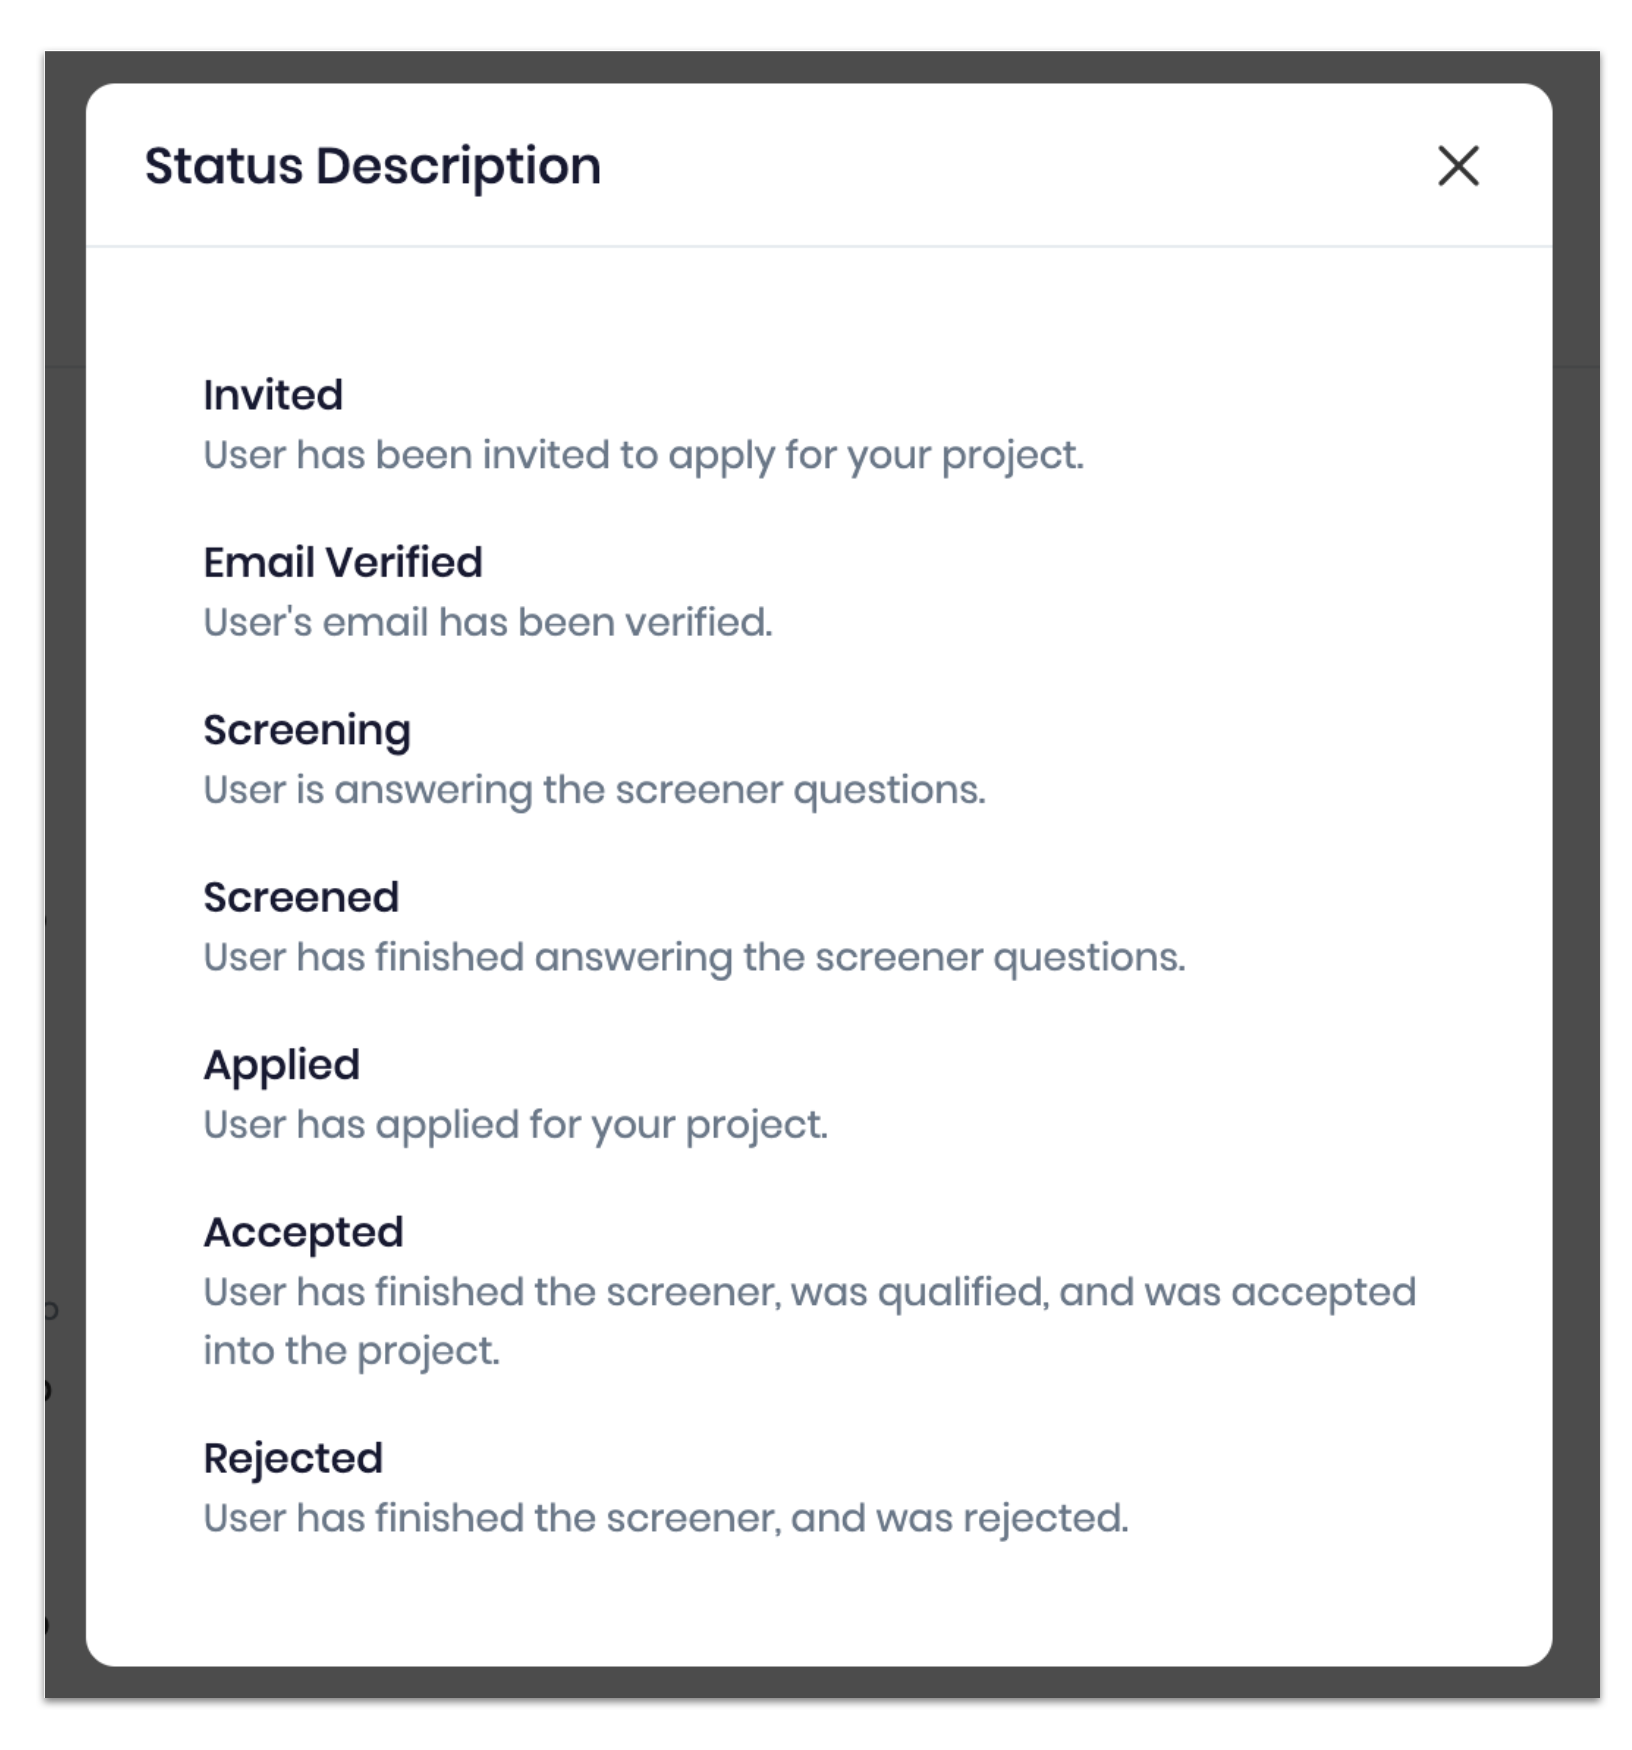
Option 2:
1. Click on Participants.
2. Check the user’s status by looking at their profile summary.
The Waiting for Confirmation tag means that the user has not yet confirmed their participation.
If a tag Waiting for Confirmation is not spotted, this means that the user has already confirmed their participation and is ready to start participating in your project and performing tasks.
Learn more about manually inviting participants to My Users projects.
Related articles
How to setup and edit recruitment details
Project applications

Comments
0 comments
Please sign in to leave a comment.